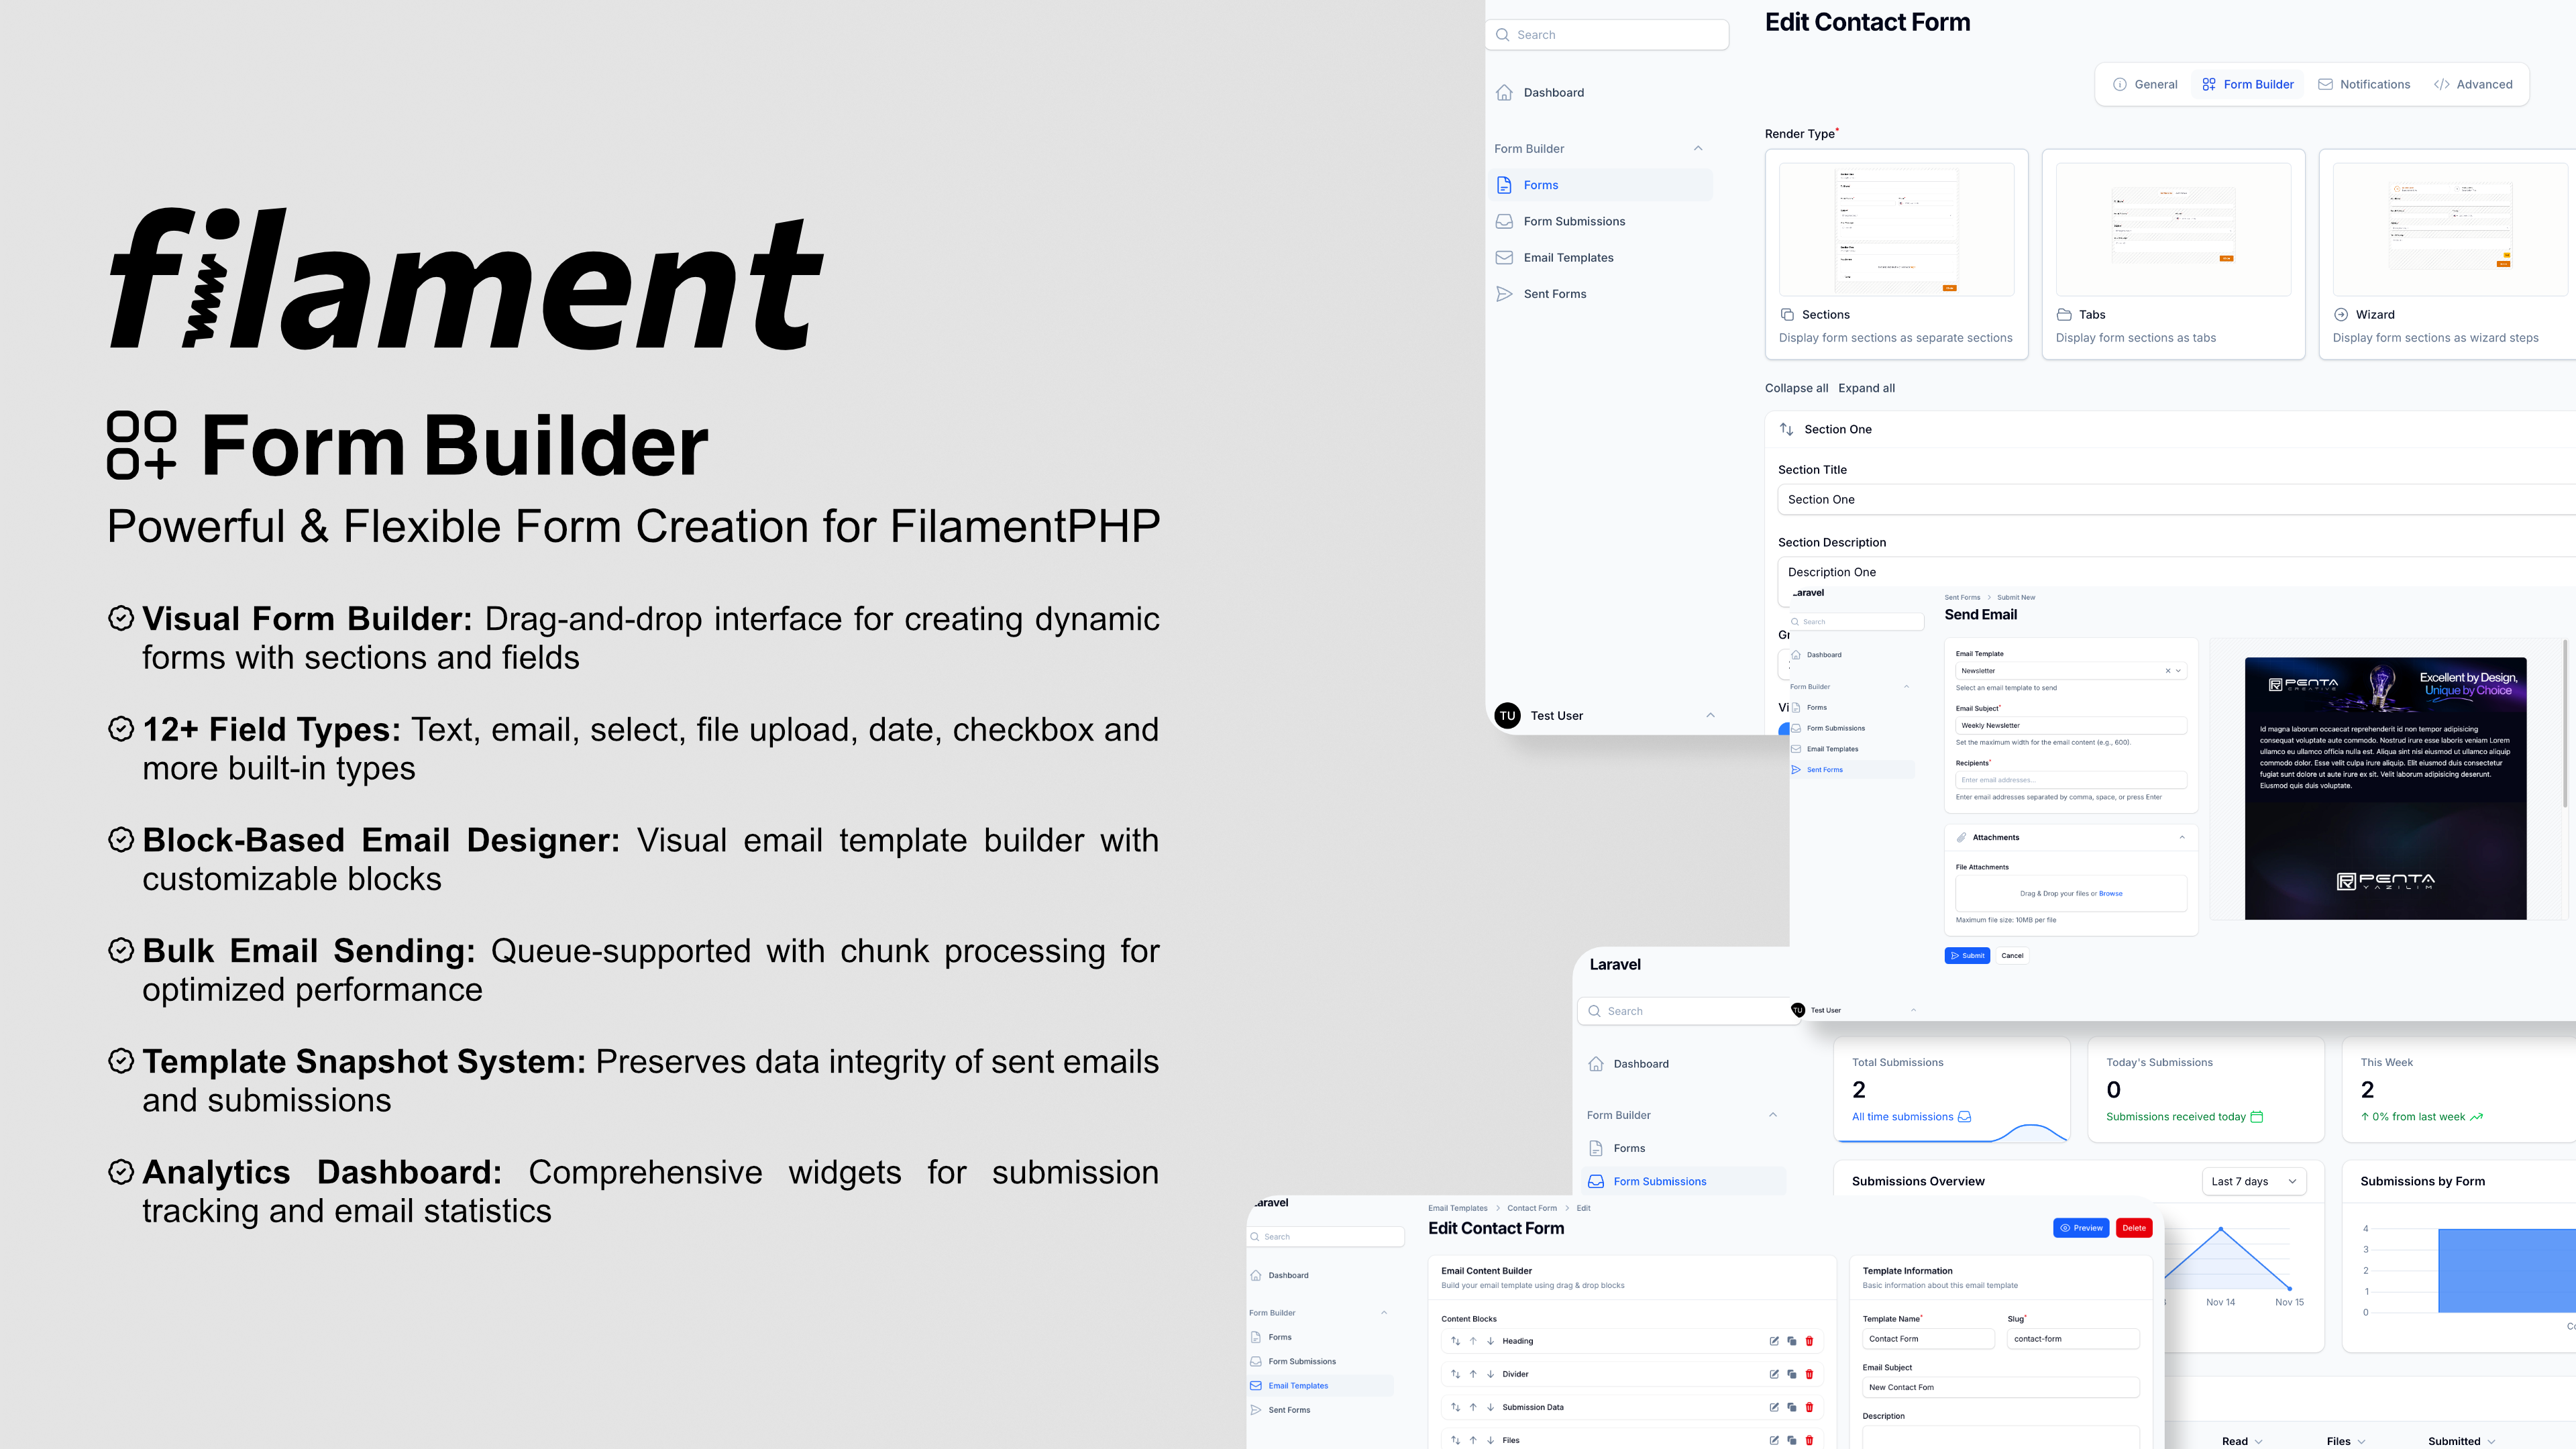
FilamentPHP Form Builder
A powerful, flexible form builder package for FilamentPHP that enables you to create, manage, and process dynamic forms with advanced features including custom field types, email templates, bulk sending capabilities, and comprehensive submission tracking.
İçindekiler
Table of Contents
Filament Form Builder
A powerful, flexible form builder package for FilamentPHP that enables you to create, manage, and process dynamic forms with advanced features including custom field types, email templates, bulk sending capabilities, and comprehensive submission tracking.
Overview
Filament Form Builder is a comprehensive solution for building and managing forms within the FilamentPHP ecosystem. It provides a visual form builder interface, customizable field types, advanced email templating, and robust submission management.
Key Features
- Visual Form Builder: Intuitive drag-and-drop interface for creating forms with sections and fields
- Multiple Form Types: Support for both site-facing and panel forms
- Custom Field Types: 12+ built-in field types with extensibility for custom fields
- Advanced Email System:
- Visual email template builder with block-based design
- Bulk email sending with chunk processing
- CSV Email Import: Import email addresses from CSV files with automatic validation
- Email Tracking: Track opens, engagement, and analytics with automatic tracking pixels
- Queue support for optimized performance
- Custom email blocks
- Template Snapshot: Automatic preservation of email templates at send/submission time
- Submission Management: Track, view, and manage form submissions with metadata
- File Handling: Upload and manage file submissions with Spatie Media Library integration
- Events & Listeners: Comprehensive event system for form submissions and email sending
- Form Sends: Send templated emails to multiple recipients with tracking
- Extensible Architecture: Create custom field types and email blocks using artisan commands
- Validation: Built-in validation with customizable rules per field type
- Responsive: Works seamlessly on desktop and mobile devices
- Data Integrity: Template snapshot feature ensures sent emails remain consistent even after template changes
- Analytics Widgets: Comprehensive dashboard widgets for submission and send tracking with charts and statistics
- Localization: Full internationalization support with English and Turkish translations (easily extendable to other languages)
Built-in Field Types
- Text
- Textarea
- Number
- Phone
- URL
- Date
- Select (single/multiple)
- Radio
- Checkbox
- File Upload
- Hidden
Built-in Email Blocks
- Text Block
- Heading Block
- Button Block
- Image Block
- Divider Block
- Spacer Block
- Submission Data Block
- Files Block
Requirements
- PHP 8.2 or higher
- Laravel 12.0 or higher
- FilamentPHP 4.0 or higher
- Spatie Laravel Media Library
Installation
1. Install the Package
This package requires a valid license to use. You can get your license here: Filament Form Builder
To install you'll need to add the repository to your composer.json file:
{
    "repositories": [
        {
            "type": "composer",
            "url": "https://satis.afsakar.com"
        }
    ]
}
Once the repository has been added to the composer.json file, you can install Filament Form builder like any other composer package using the composer require command:
composer require afsakar/filament-form-builder
You will be prompted to provide your username and password. The username will be the email address and the password will be equal to your license key.
Loading composer repositories with package information
Authentication required (satis.afsakar.com):
Username: [license-email]
Password: [license-key]
Next, add the plugin's views to your custom theme in your theme.css file:
@source '../../../../vendor/afsakar/filament-form-builder/resources/views/**/*.blade.php';
@source '../../../../vendor/afsakar/filament-form-builder/src/**/*.php';
Afterward, run npm run build or yarn build to compile assets.
2. Publish Configuration
Publish the configuration file:
php artisan vendor:publish --tag="form-builder-config"
3. Publish Migrations
Publish the migration files:
php artisan vendor:publish --tag="form-builder-migrations"
4. Publish Render Type Images
Publish the render type images used in the form builder:
php artisan vendor:publish --tag="form-builder-images"
Publish Spatie Media Library migrations if you haven't done so:
php artisan vendor:publish --provider="Spatie\MediaLibrary\MediaLibraryServiceProvider" --tag="medialibrary-migrations"
4. Run Migrations
Execute the migrations to create the necessary database tables:
php artisan migrate
This will create all necessary tables including:
- Core form builder tables (forms, sections, fields)
- Submission and send tracking tables
- Template snapshot columns for data integrity
- Media library tables for file uploads
The package includes backfill migrations that automatically populate template snapshots for any existing records.
5. Publish Views (Optional)
If you want to customize the views:
php artisan vendor:publish --tag="form-builder-views"
6. Register the Plugin
Register the plugin in your Filament Panel provider (typically app/Providers/Filament/AdminPanelProvider.php):
use Afsakar\FilamentFormBuilder\FilamentFormBuilderPlugin;

public function panel(Panel $panel): Panel
{
    return $panel
        // ...
        ->plugins([
            FilamentFormBuilderPlugin::make(),
        ]);
}
Add styles to your theme.css file and run npm run build to compile your assets.
@source '../../../../vendor/afsakar/filament-form-builder/resources/views/**/*.blade.php';
@source '../../../../vendor/afsakar/filament-form-builder/src/**/*.php';
7. Configure Environment Variables (Optional)
Add these variables to your .env file to customize email queue settings:
FORM_BUILDER_EMAIL_CHUNK_SIZE=50
FORM_BUILDER_EMAIL_CHUNK_DELAY=5
FORM_BUILDER_EMAIL_QUEUE=default
Configuration
The configuration file config/form-builder.php allows you to customize various aspects:
Models
You can override the default models:
'models' => [
    'form' => \Afsakar\FilamentFormBuilder\Models\Form::class,
    'form_section' => \Afsakar\FilamentFormBuilder\Models\FormSection::class,
    'form_field' => \Afsakar\FilamentFormBuilder\Models\FormField::class,
    'form_submission' => \Afsakar\FilamentFormBuilder\Models\FormSubmission::class,
    'form_send' => \Afsakar\FilamentFormBuilder\Models\FormSend::class,
    'email_template' => \Afsakar\FilamentFormBuilder\Models\EmailTemplate::class,
],
Sender Model
Define the model used for tracking who sends bulk emails:
'sender' => \App\Models\User::class,
Number Prefixes
Customize unique number prefixes for submissions and sends:
'number_prefix' => [
    'submission' => 'SUB-',
    'send' => 'SEND-',
],
Email Queue Settings
Configure email sending performance:
'email_chunk_size' => 50,        // Number of emails per chunk
'email_chunk_delay' => 5,        // Seconds between chunks
'email_queue' => 'default',      // Queue name
Custom Field Types
Register your custom field types:
'field_types' => [
    \App\FormFields\CustomField::class,
],
Custom Email Blocks
Register your custom email blocks:
'email_blocks' => [
    \App\EmailBlocks\CustomBlock::class,
],
Icons
Customize field type icons:
'icons' => [
    'field_types' => [
        'text' => Heroicon::OutlinedPencil,
        'email' => Heroicon::OutlinedEnvelope,
        // ...
    ],
],
Usage
Creating a Form
- Navigate to Forms in your Filament admin panel
- Click New Form
- Fill in the form details:
- Title: Name of your form
- Slug: URL-friendly identifier
- Type: Site (public) or Panel (admin)
- Description: Optional description
- Status: Draft, Active, or Inactive
- Email Template: Optional template for submission notifications
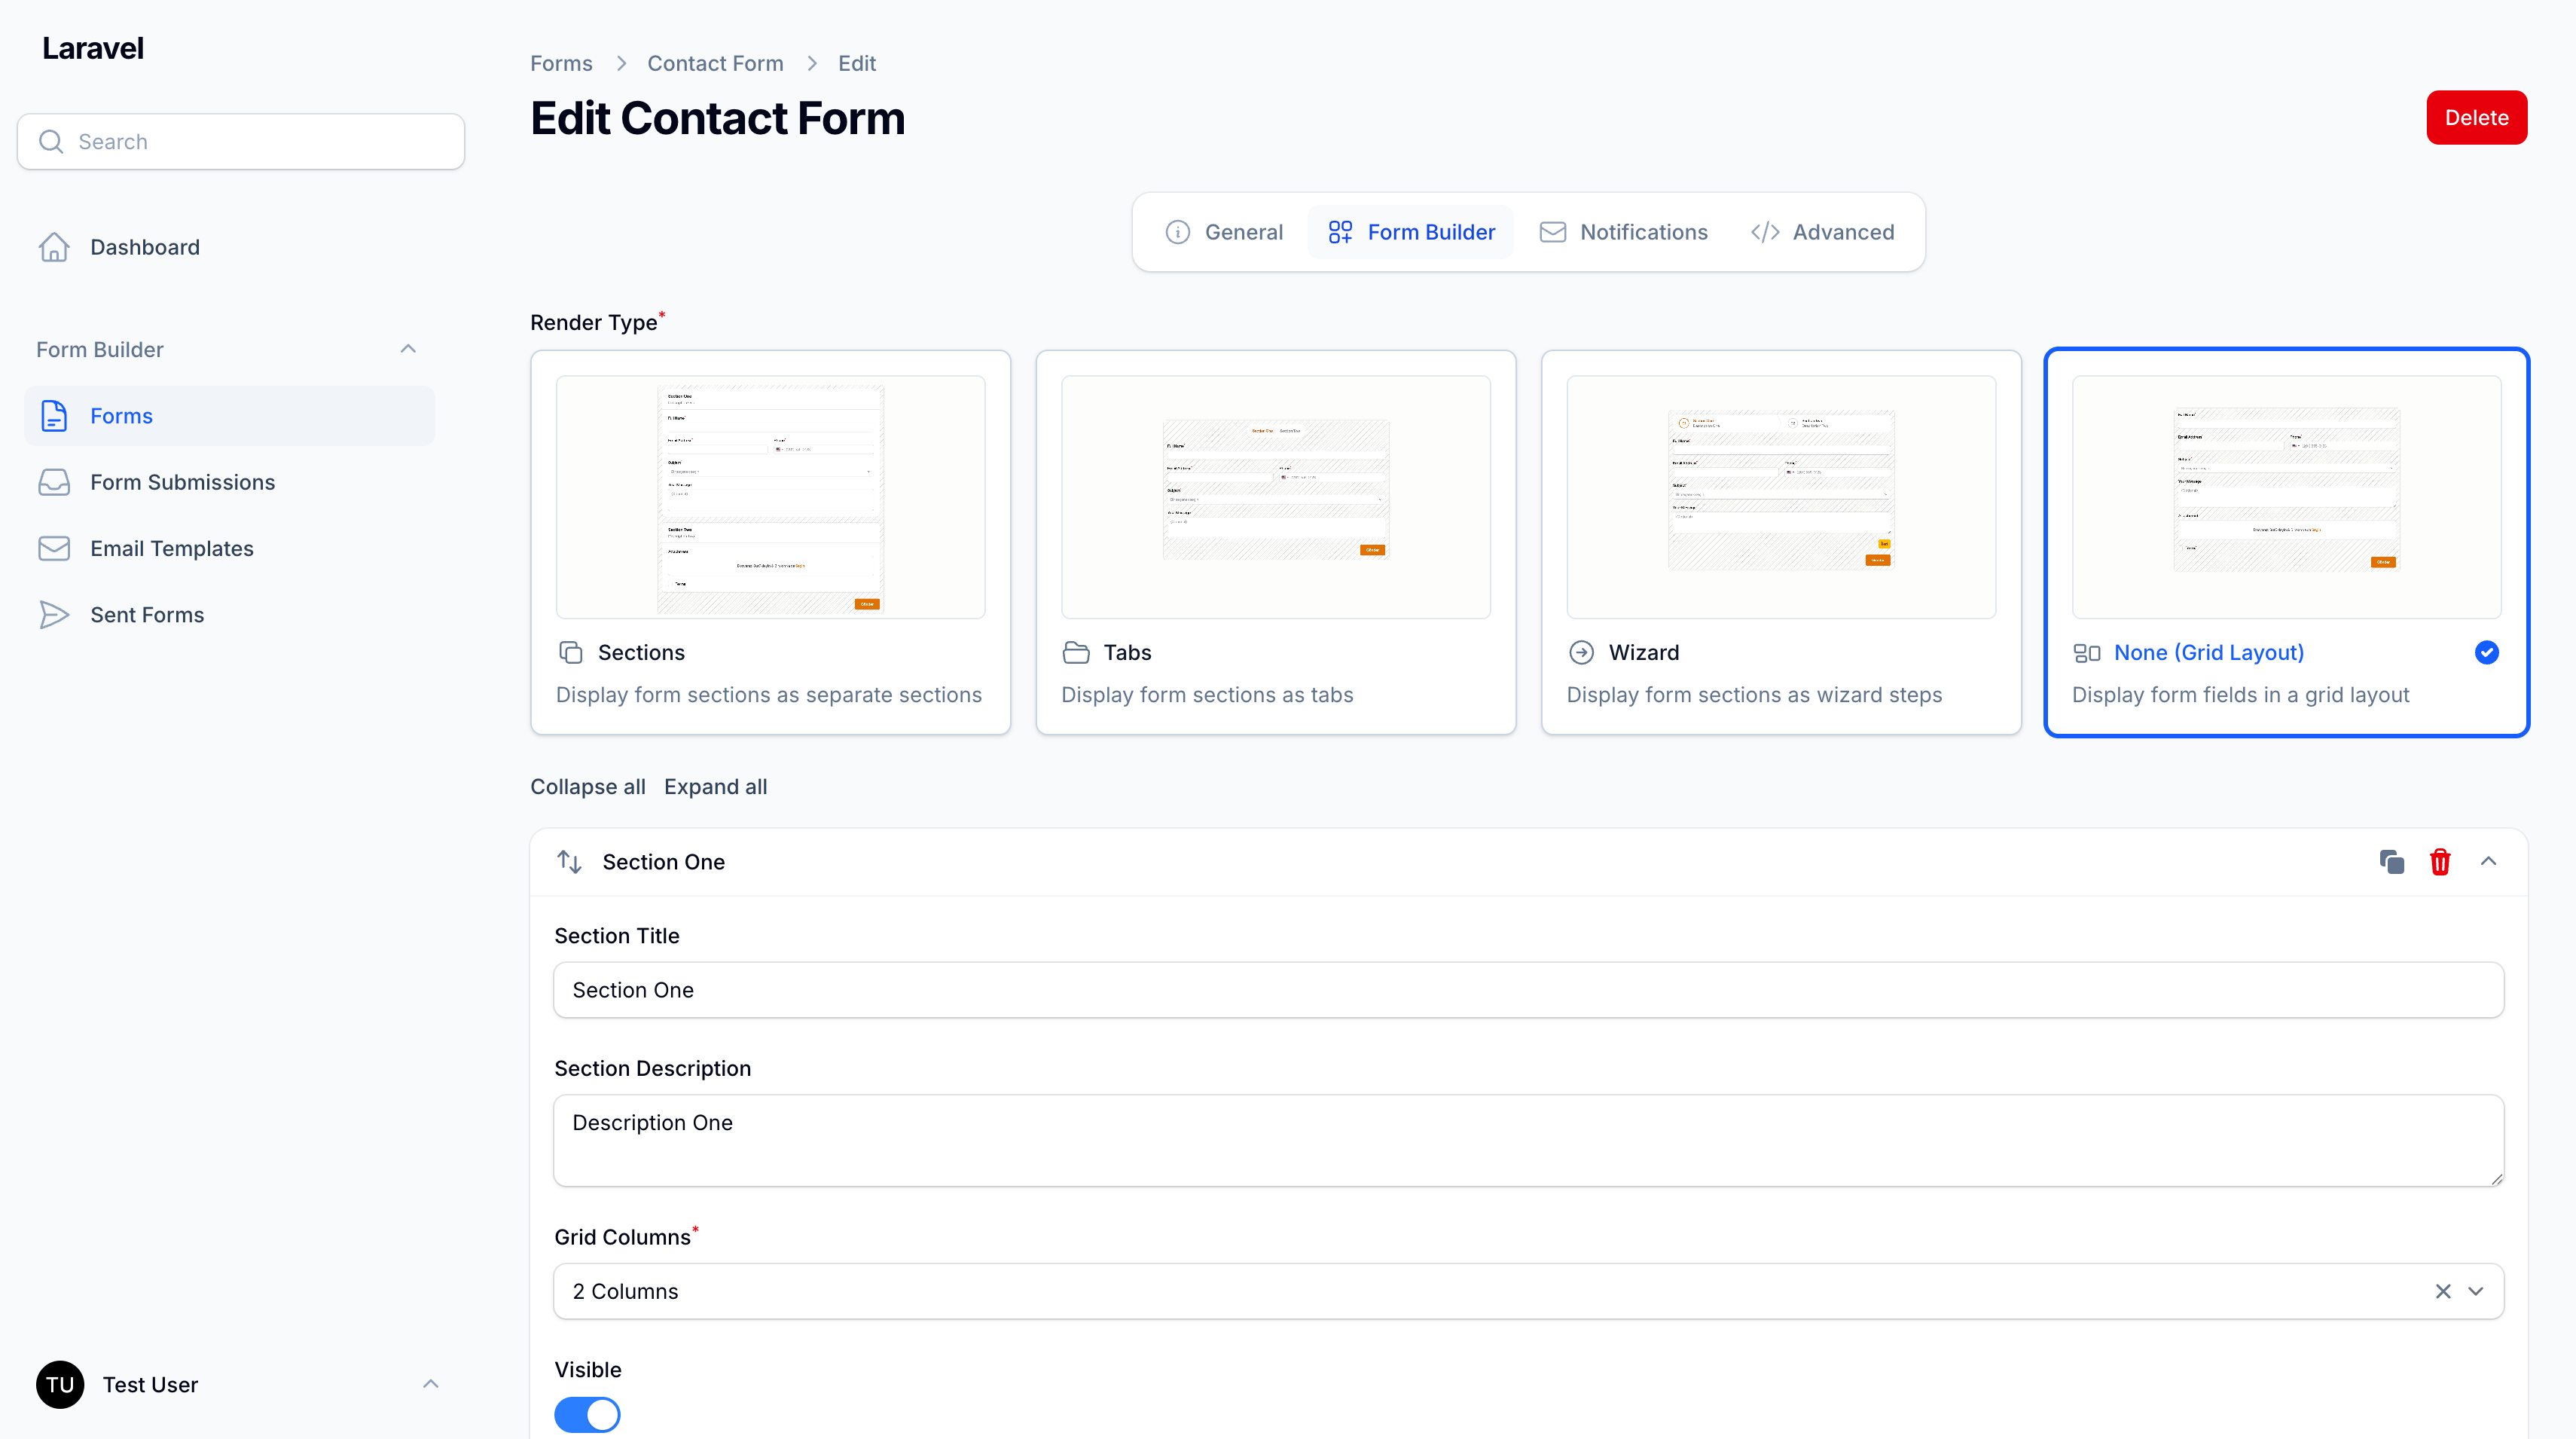
Adding Sections and Fields
- After creating a form, add sections to organize your fields
- Within each section, add fields:
- Select field type
- Configure field properties
- Set validation rules
- Customize appearance
Conditional Visibility
You can make any field conditionally visible based on other field values.
In the field edit modal:
- Open the Conditions tab
- Enable Conditional Visibility
- Choose match logic:
- All rules must match (
all) - At least one rule must match (
any)
- All rules must match (
- Add one or more rules (
field,operator,value)
Supported operators:
equals,not_equalscontains,not_containsin,not_in(comma-separated values)is_empty,is_not_emptygreater_than,greater_or_equal,less_than,less_or_equal
Notes:
- Existing forms are fully backward-compatible. If a field has no condition, behavior is unchanged.
- Hidden conditional fields are not dehydrated and are not validated as required until visible.
Programmatic example (form_fields.configuration):
{
  "visibility_condition": {
    "enabled": true,
    "logic": "all",
    "rules": [
      { "field": "account_type", "operator": "equals", "value": "business" },
      { "field": "employee_count", "operator": "greater_than", "value": "10" }
    ]
  }
}
Rendering a Form
For site-facing forms, use the Livewire component in your Blade template:
<livewire:form-renderer form-slug="contact-form" />
Or include it in your layout:
@livewire('form-renderer', ['formSlug' => 'contact-form'])
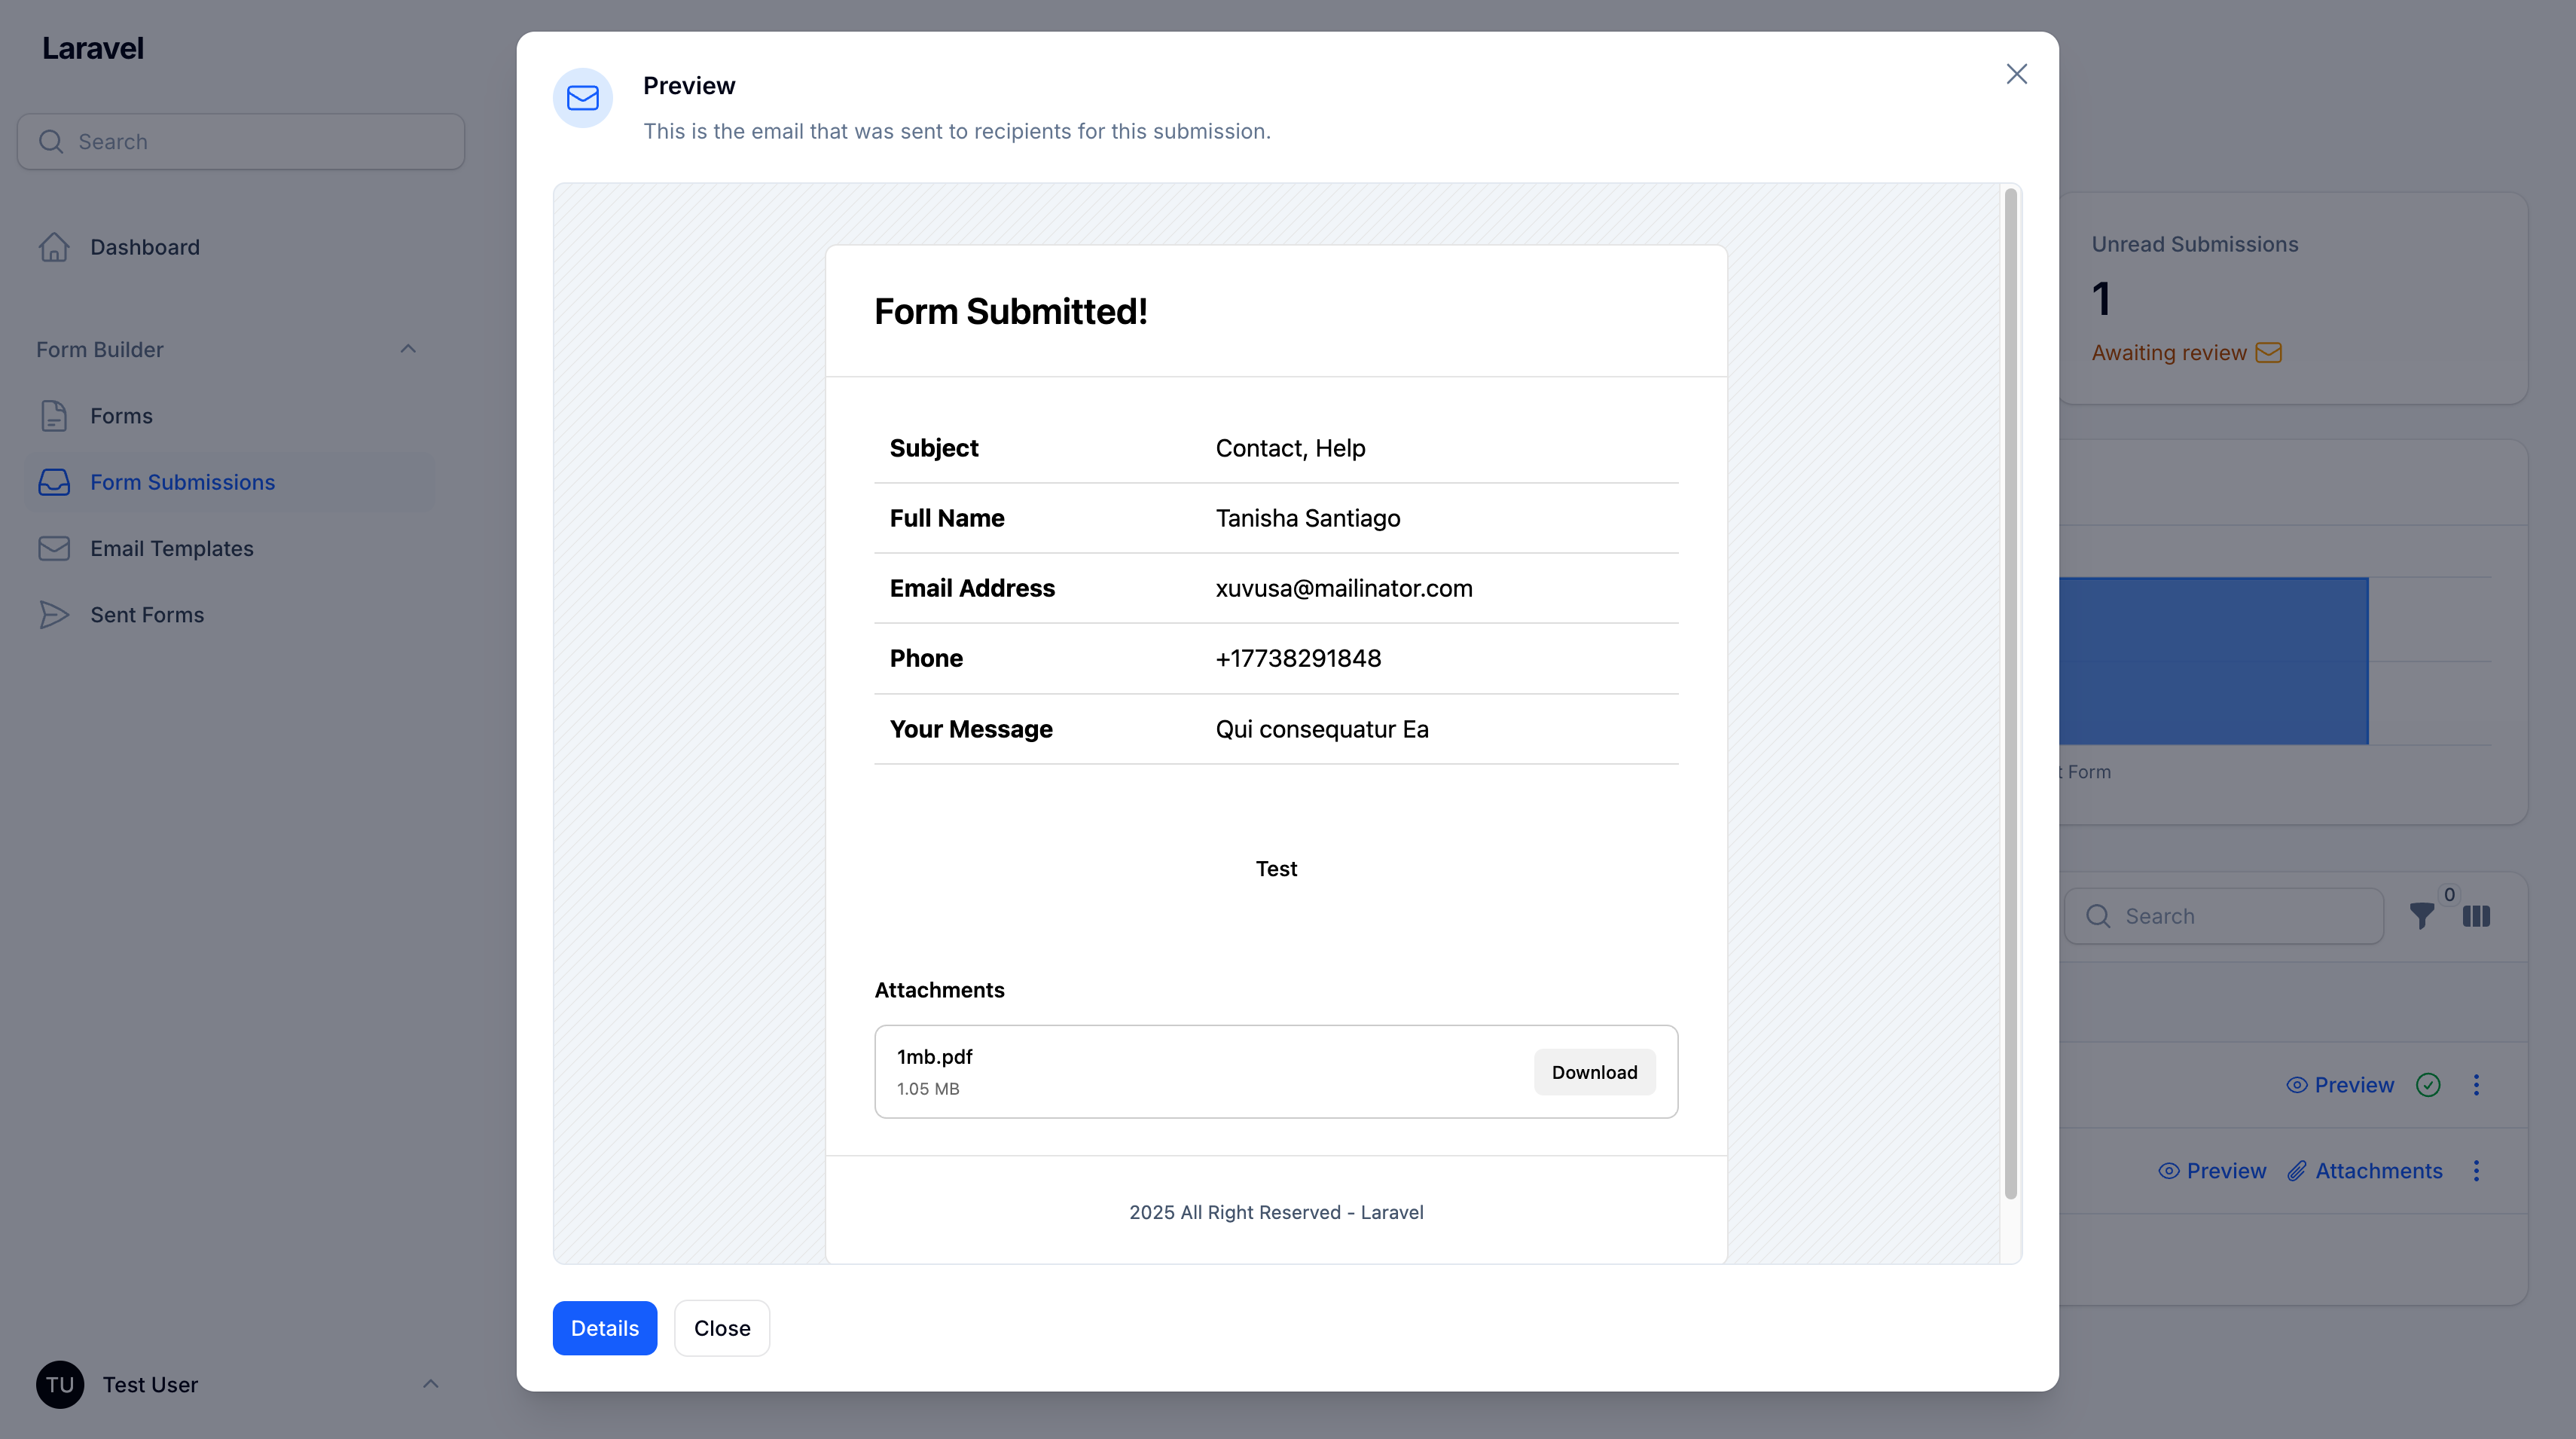
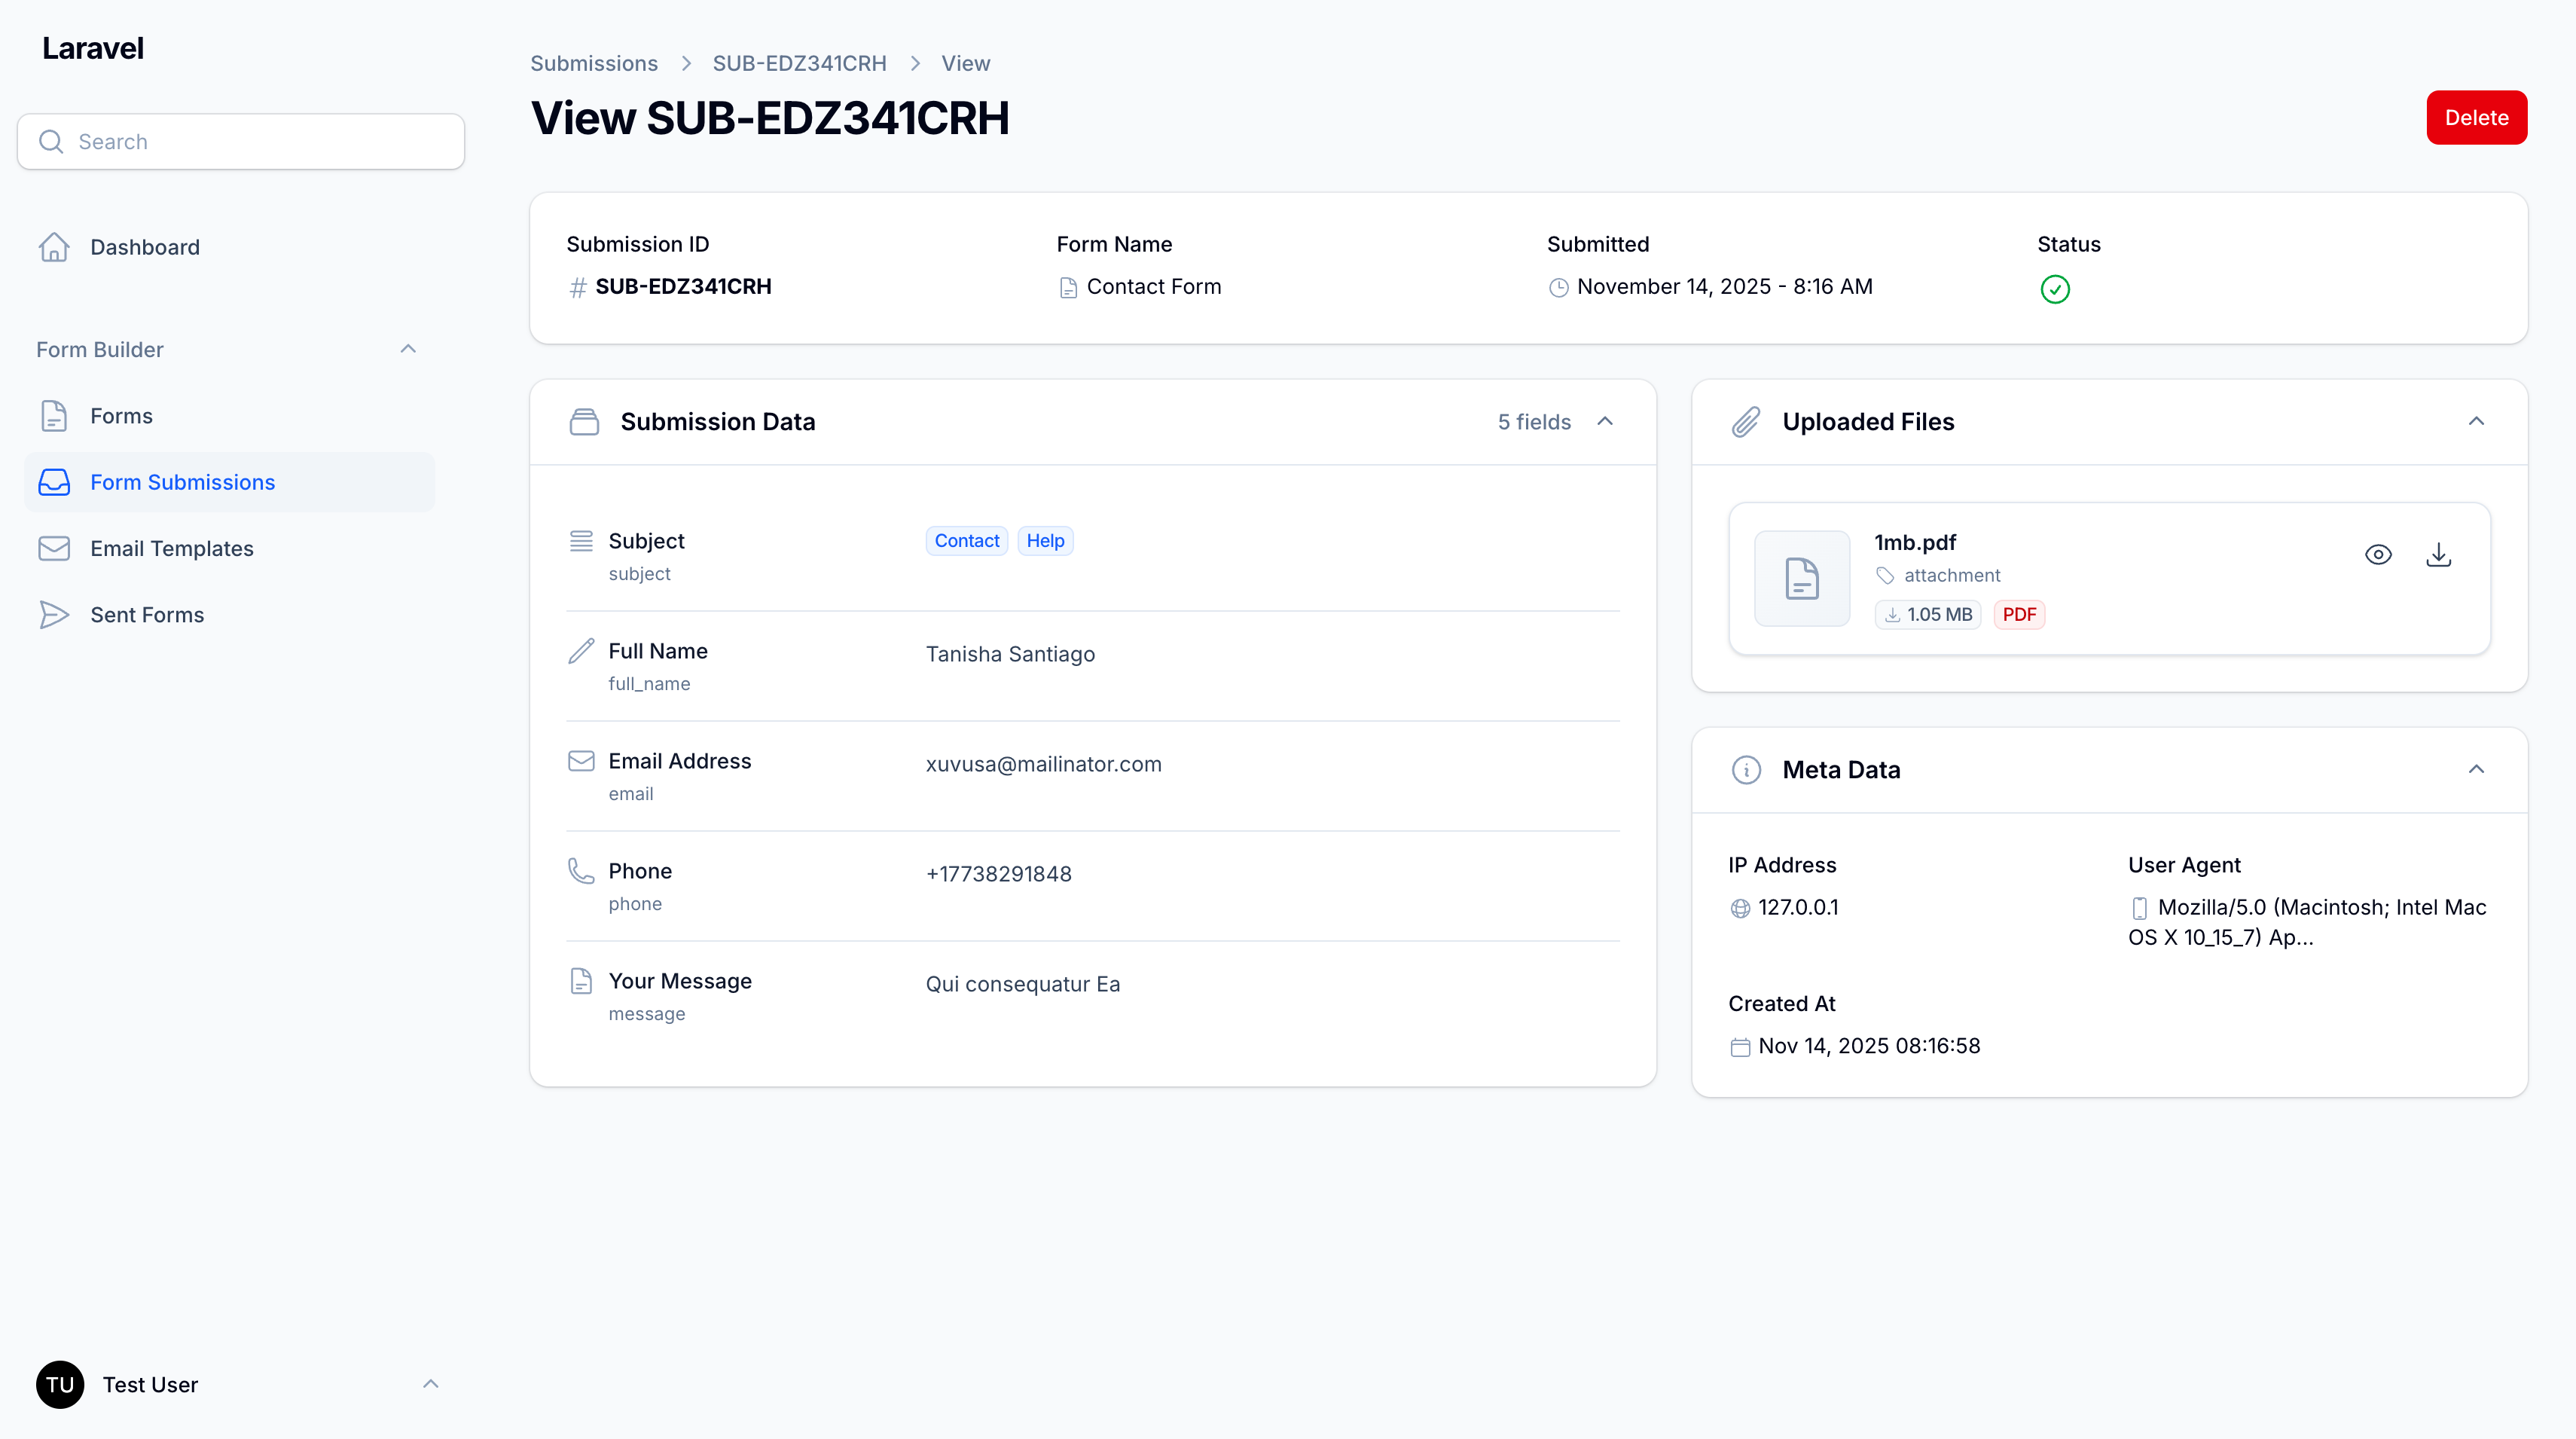
Form Submissions
View and manage form submissions:
- Navigate to Form Submissions
- View submission details including:
- Unique number
- Form name
- Submission data
- Metadata (IP, user agent, timestamp)
- Uploaded files
- Mark submissions as read/unread
- Export submission data

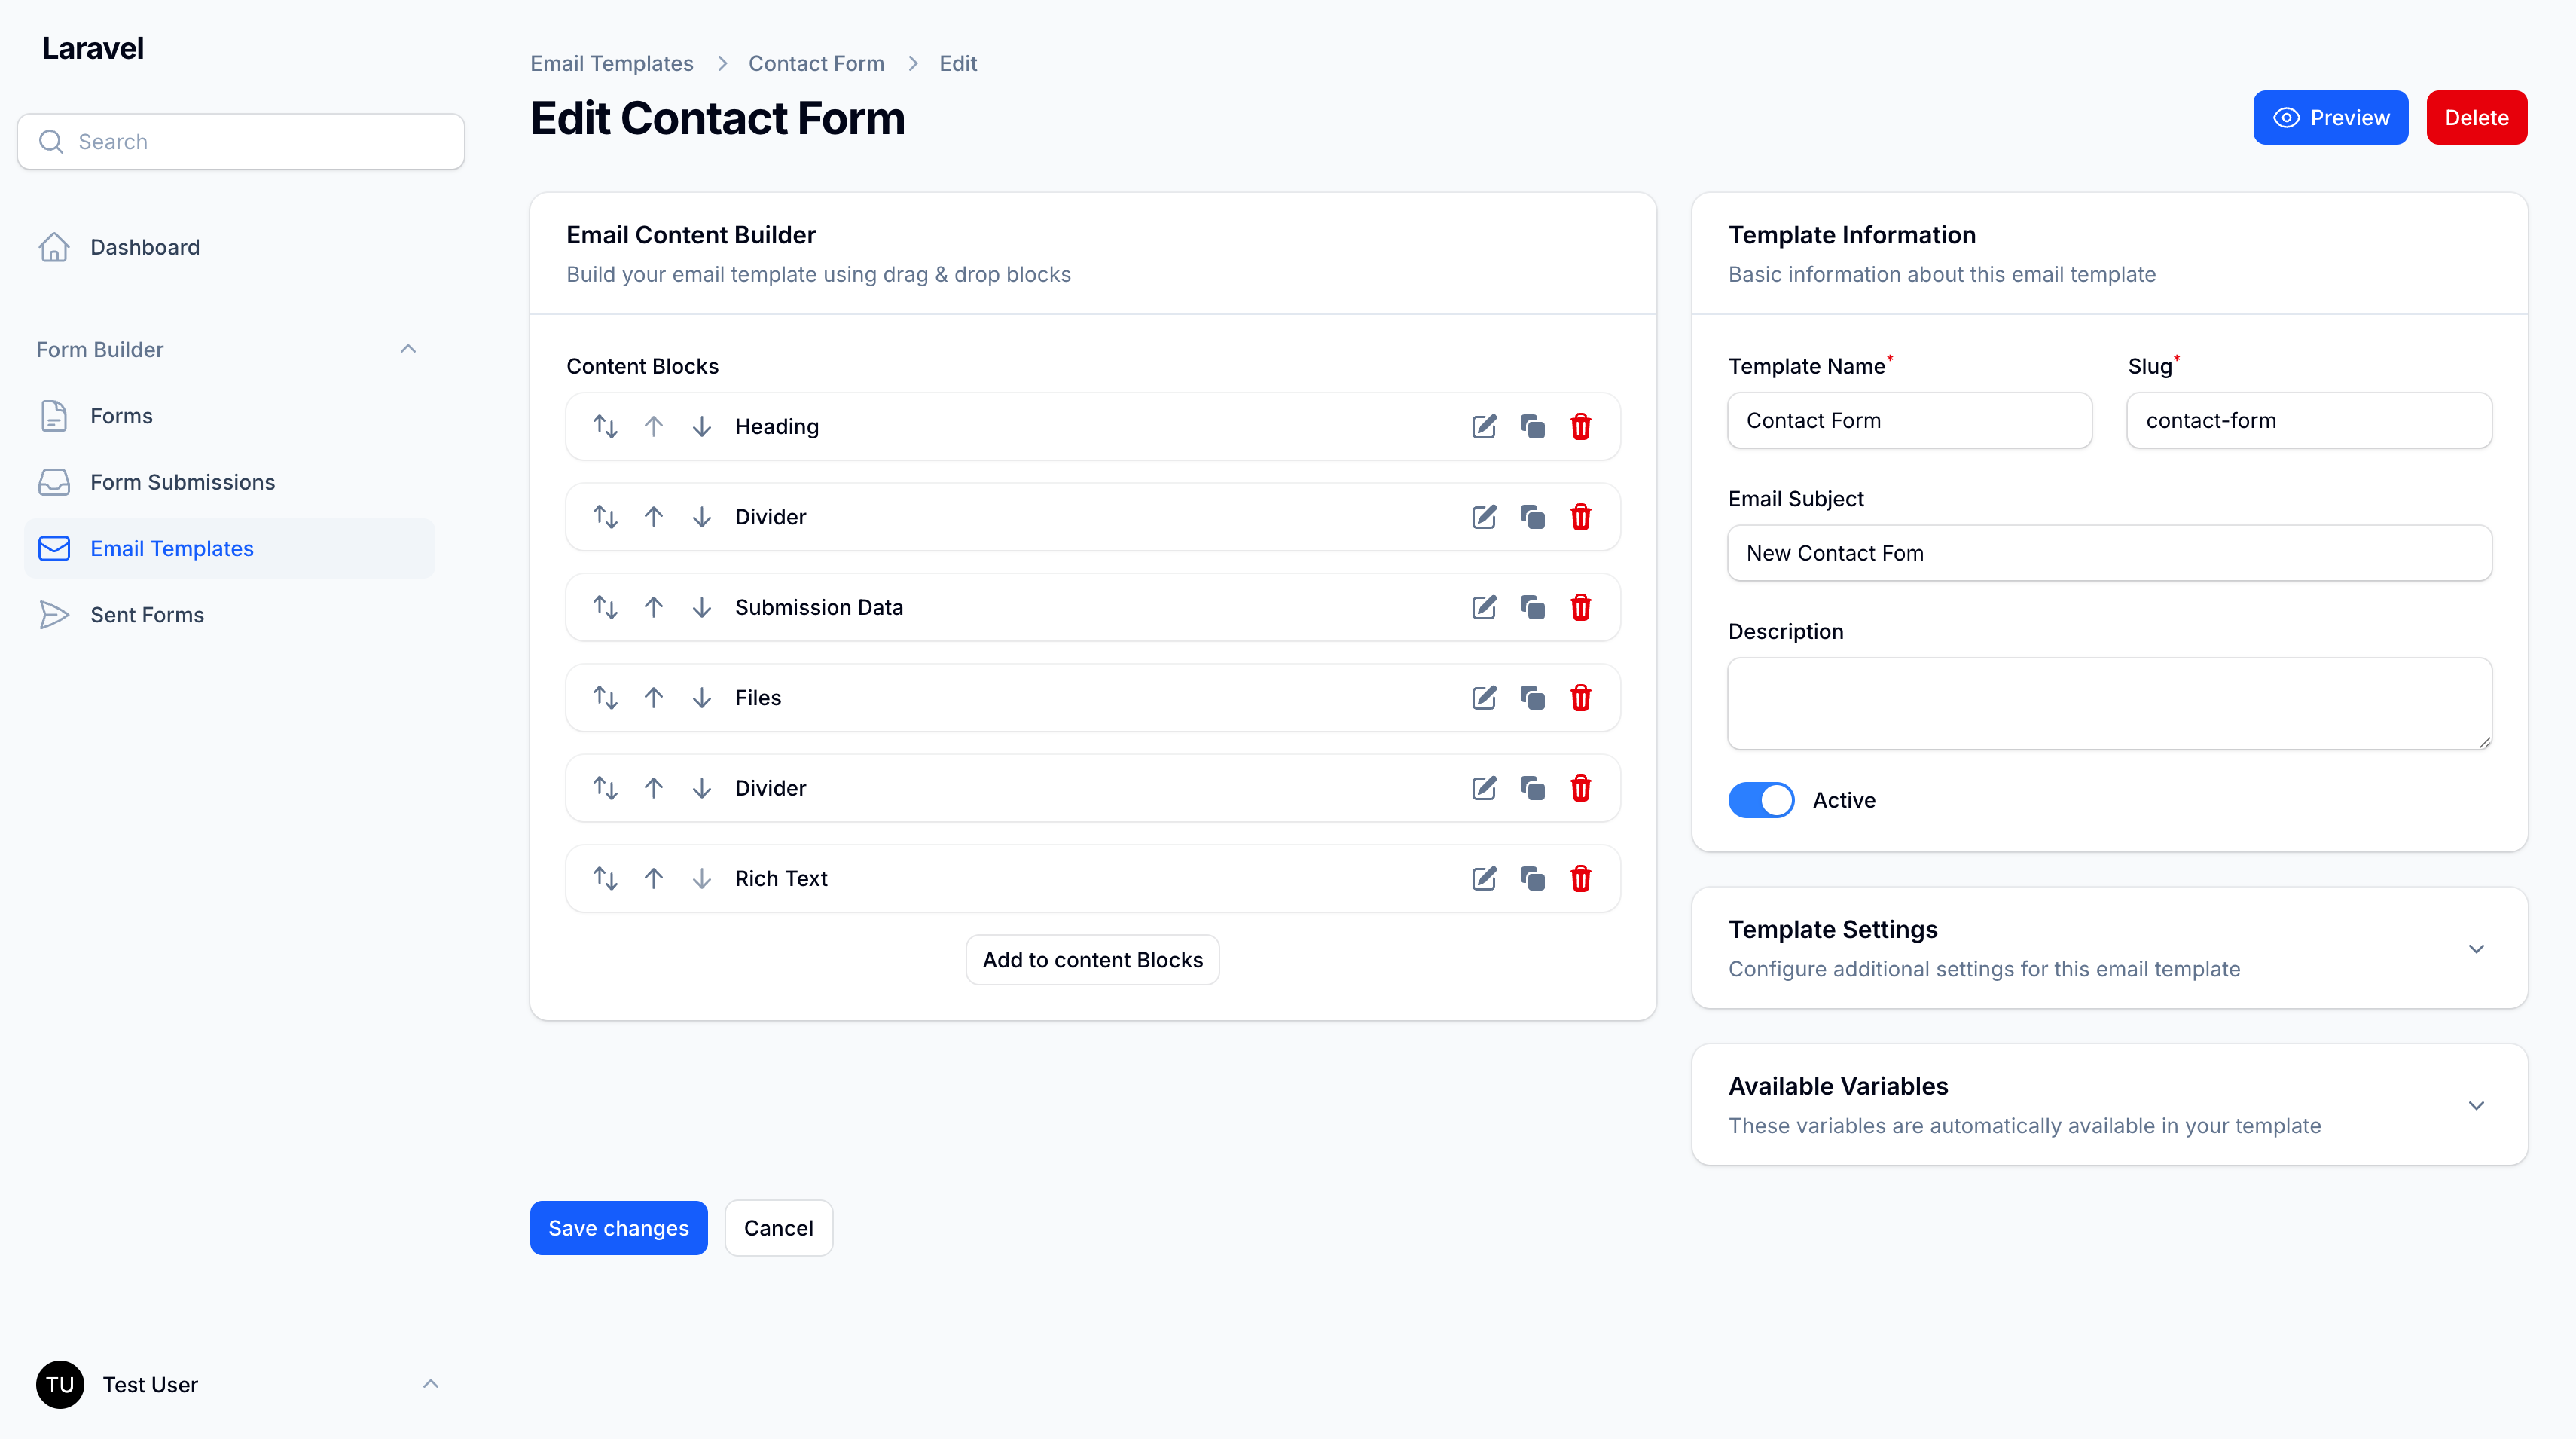
Email Templates
Create reusable email templates with a visual block builder:
- Navigate to Email Templates
- Create a new template
- Add blocks to design your email:
- Text blocks for content
- Heading blocks for titles
- Button blocks for CTAs
- Submission data blocks to display form data
- File blocks for attachments
- And more...
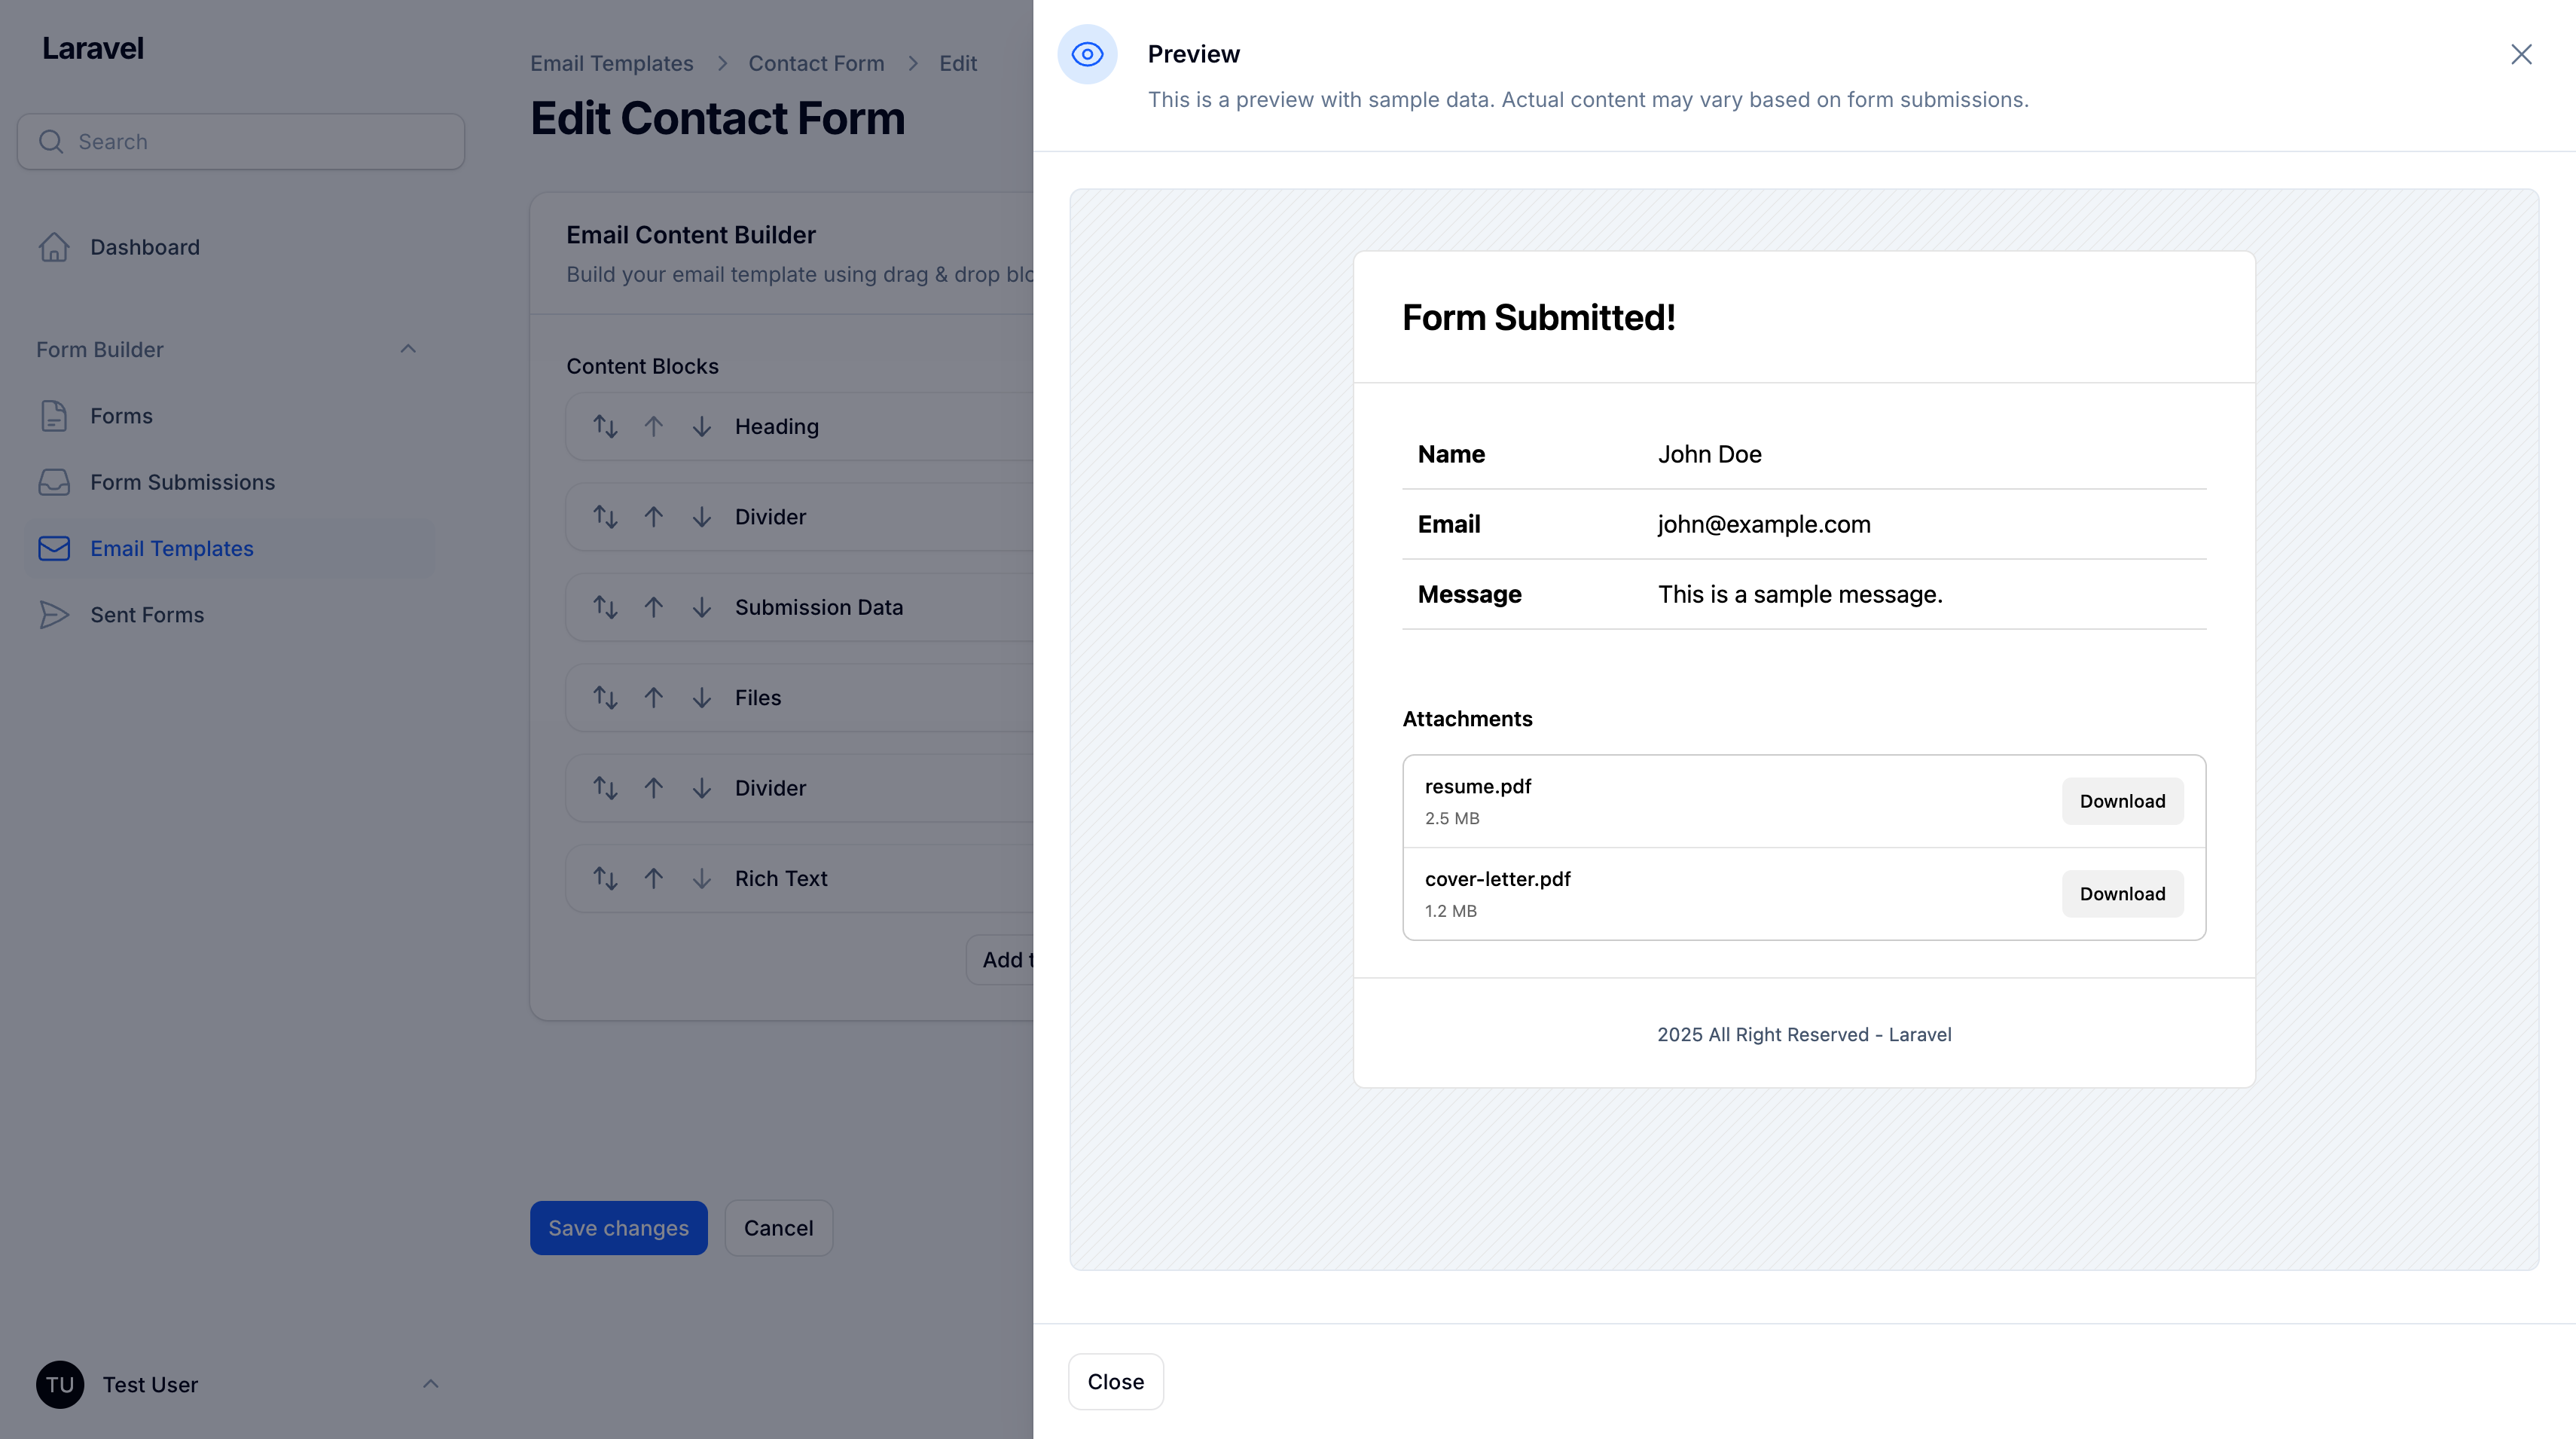
Bulk Email Sending (Form Sends)
Send templated emails to multiple recipients:
- Navigate to Form Sends
- Click New Send
- Select an email template
- Add recipients (comma-separated or one per line)
- Customize subject and additional data
- Send immediately or queue for processing
The system automatically chunks large recipient lists for optimal performance.

CSV Email Import
Quickly import multiple email addresses from CSV files:
Supported Formats:
- Simple list (one email per line)
- CSV with "email" header column
- Multi-column CSV (automatically detects email column)
Features:
- Automatic email validation
- Duplicate removal
- Merge with existing recipients
- Real-time import feedback
- Smart error handling
- Maximum 5MB file size
Usage:
- On the Form Send creation page, locate the CSV File upload field
- Upload your CSV file (drag & drop or click to browse)
- Emails are automatically imported and added to the Recipients field
- Review the imported emails and make any manual adjustments
- Complete the form and send
Example CSV Formats:
Simple list:
john@example.com
jane@example.com
bob@example.com
With header:
email
john@example.com
jane@example.com
Multi-column (email column auto-detected):
name,email,company
John Doe,john@example.com,ACME Corp
Jane Smith,jane@example.com,Tech Inc
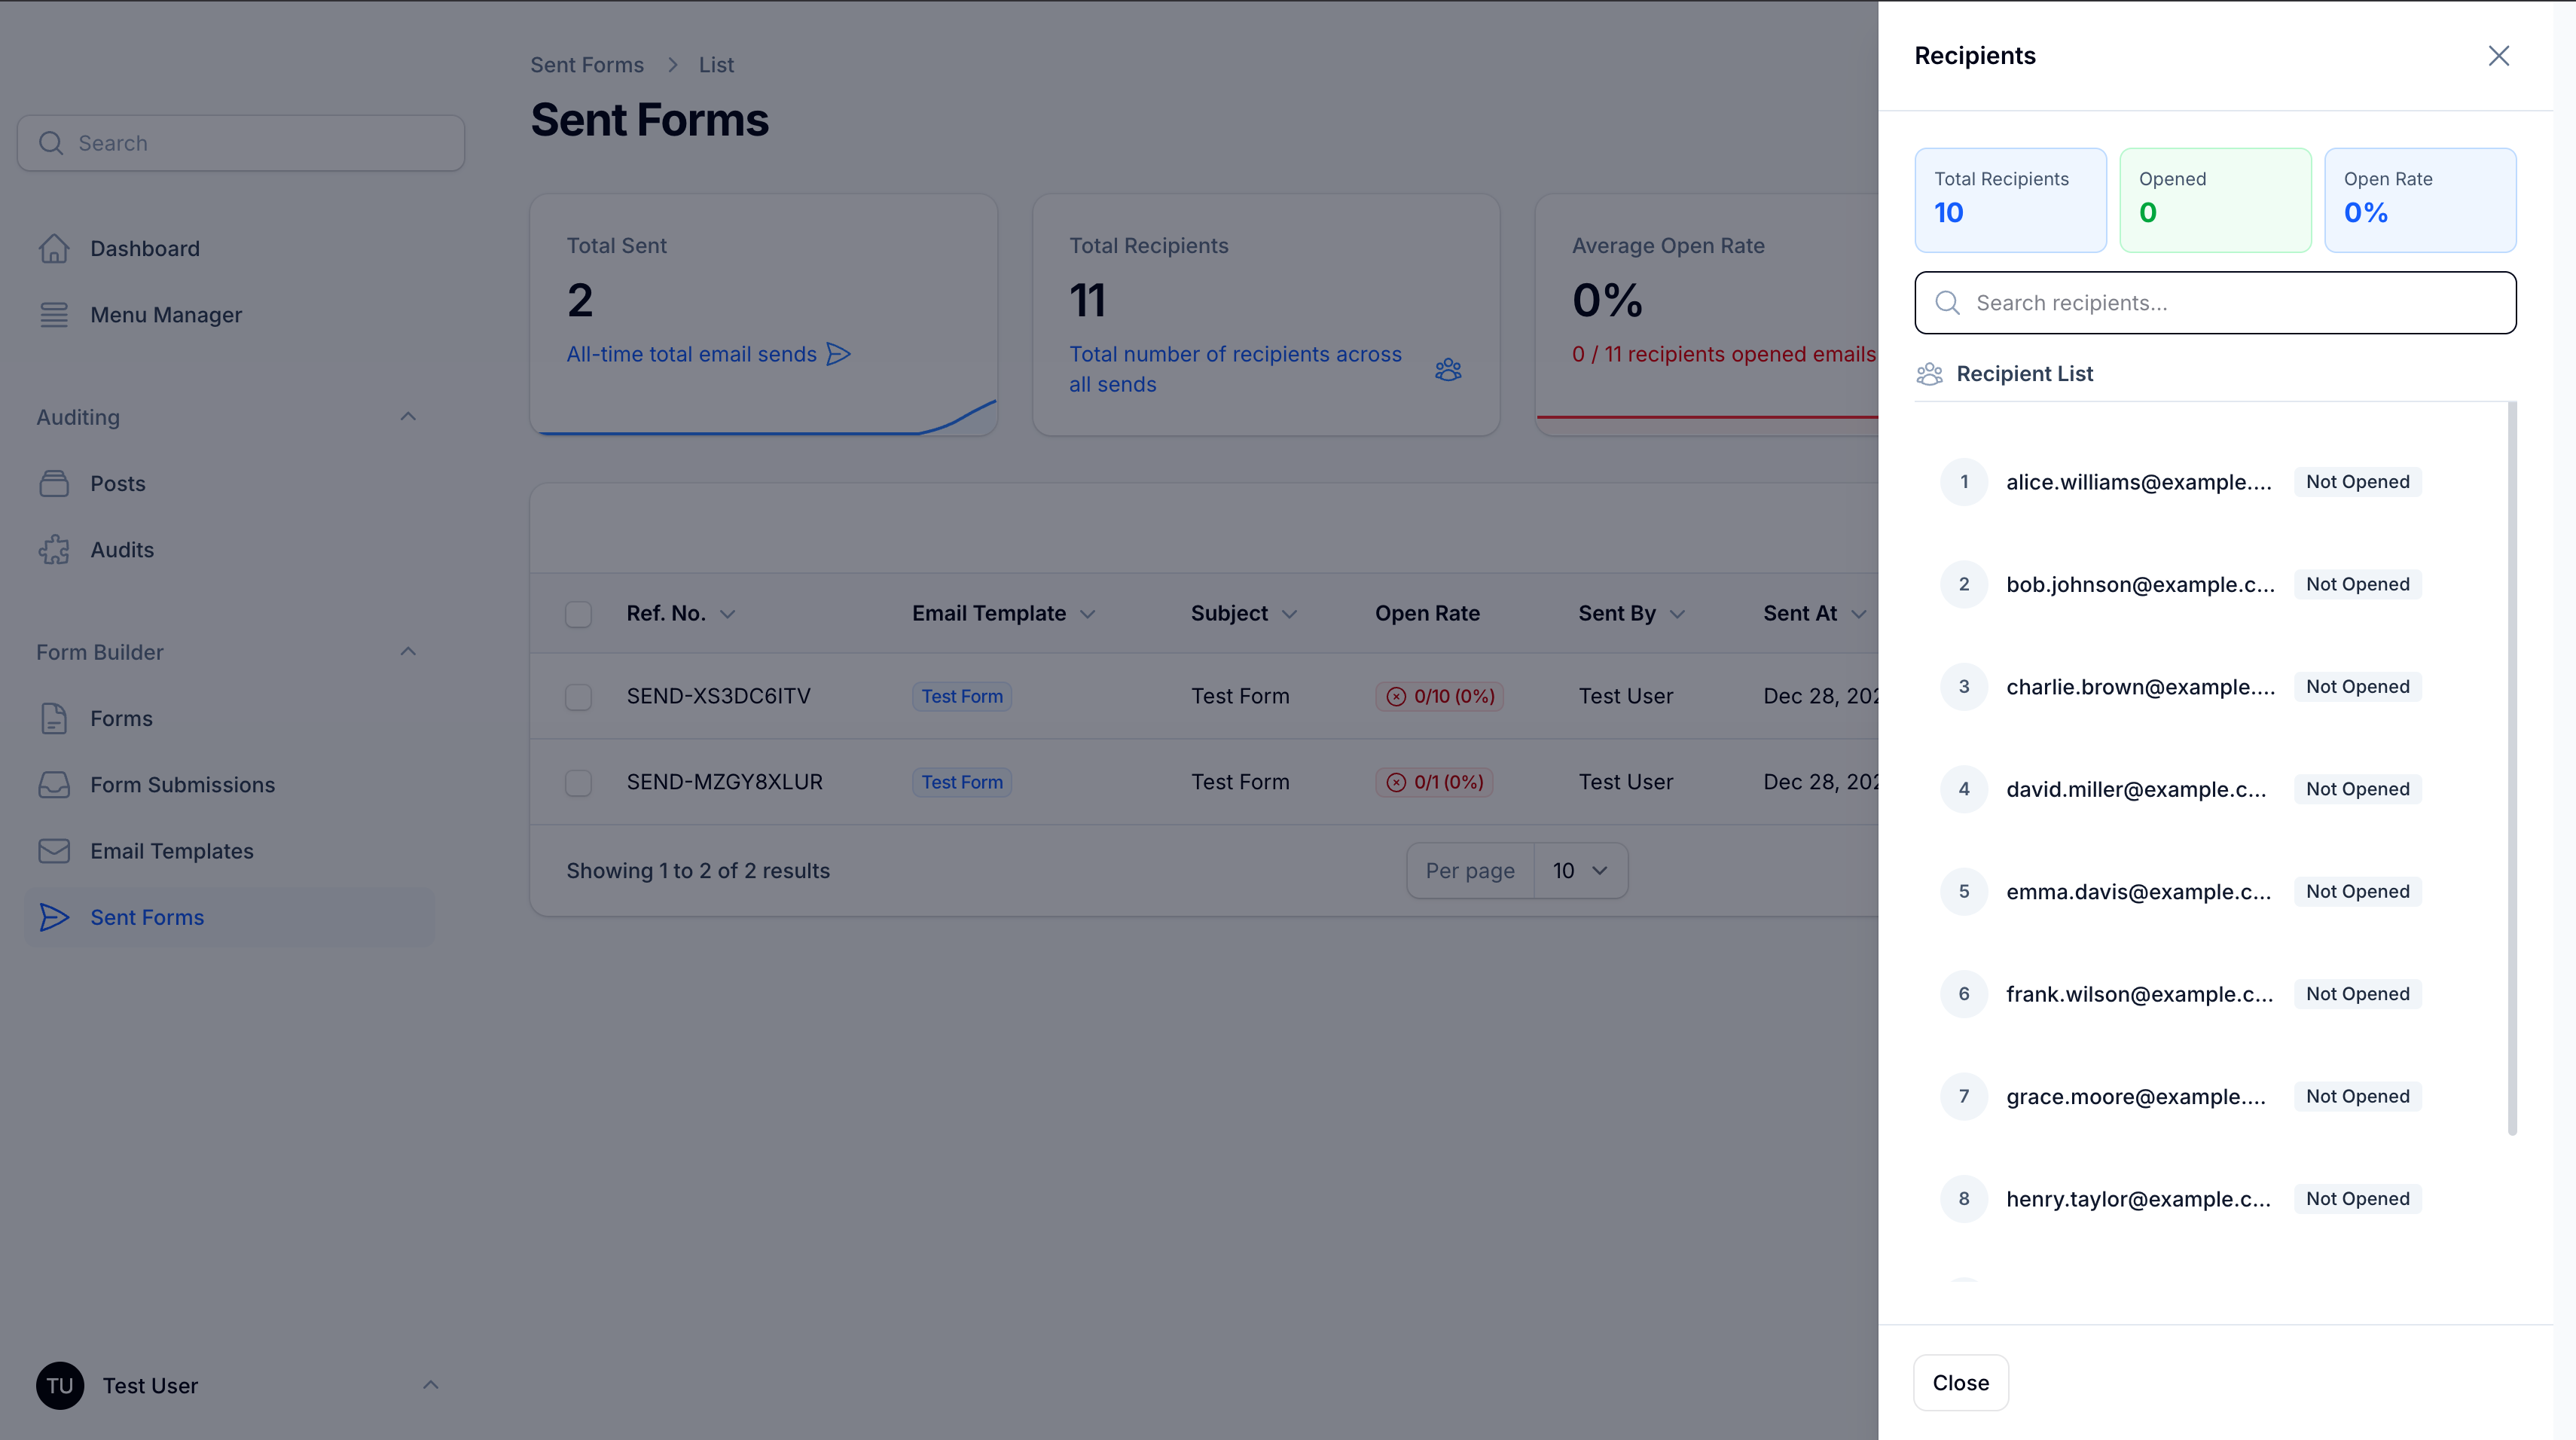
Email Tracking & Analytics
Track email opens and engagement with powerful analytics:
Tracking Features:
- Open Tracking: Know when recipients open your emails
- Open Count: See how many times each email was opened
- Open Rate: Calculate engagement percentage automatically
- IP & User Agent: Track who opened from where
- First & Last Open: See when emails were first and last opened
- Real-time Updates: Tracking updates automatically when emails are opened
How It Works:
- When you send emails, each recipient gets a unique tracking token
- A 1x1 transparent tracking pixel is automatically added to emails
- When a recipient opens the email, the pixel is loaded
- The system records the open event with timestamp, IP, and user agent
- View detailed statistics in the Form Sends list and recipient modal
UI Features:
- Open Rate Column: See engagement at a glance (colored badges)
- 🟢 Green: ≥80% opened
- 🟡 Yellow: 50-79% opened
- 🔴 Red: <50% opened
- ⚪ Gray: 0% opened
- Recipient List Modal:
- View all recipients with their open status
- Search and filter recipients
- See individual open counts ("Opened 3x")
- View last opened timestamp
- Copy email addresses with one click
Analytics Dashboard:
Total Recipients: 500
Opened: 350
Open Rate: 70%
Privacy Note: Email tracking uses standard industry practices (tracking pixels) and should be disclosed in your privacy policy. Recipients can disable image loading in their email client to opt out of tracking.
Extending the Package
Creating Custom Field Types
Generate a new field type using the artisan command:
php artisan make:field-type CustomField --icon=heroicon-o-star
This creates a new field type class in app/FormFields/CustomFieldField.php. Implement the required methods:
<?php

namespace App\FormFields;

use Afsakar\FilamentFormBuilder\FieldTypes\AbstractFieldType;
use Filament\Forms\Components\Field;
use Filament\Forms\Components\TextInput;

class CustomFieldField extends AbstractFieldType
{
    public function getIdentifier(): string
    {
        return 'customfield';
    }

    public function getLabel(): string
    {
        return 'Custom Field';
    }

    public function getIcon(): \BackedEnum|string
    {
        return 'heroicon-o-star';
    }

    public function getConfigurationSchema(): array
    {
        return [
            TextInput::make('custom_option')
                ->label('Custom Option')
                ->default('default_value'),
        ];
    }

    public function getDefaultConfiguration(): array
    {
        return [
            'custom_option' => 'default_value',
        ];
    }

    public function getValidationRules(array $configuration, bool $isRequired): array
    {
        $rules = $this->getBaseRules($isRequired);

        // Add custom validation rules
        $rules[] = 'string';
        $rules[] = 'max:255';

        return $rules;
    }

    public function getFilamentComponent(
        string $name,
        string $label,
        array $configuration,
        bool $isRequired,
        ?string $placeholder = null,
        ?string $helpText = null,
        ?int $columnSpan = 1
    ): Field {
        $component = TextInput::make($name);

        return $this->applyCommonProperties(
            $component,
            $label,
            $isRequired,
            $placeholder,
            $helpText
        );
    }
}
Register the field type in config/form-builder.php:
'field_types' => [
    \App\FormFields\CustomFieldField::class,
],
Creating Custom Email Blocks
Generate a new email block using the artisan command:
php artisan make:email-block CustomBlock --icon=heroicon-o-cube
This creates:
- A block class in
app/EmailBlocks/CustomBlockBlock.php - A view file in
resources/views/email-blocks/custom-block.blade.php
Implement the block class:
<?php

namespace App\EmailBlocks;

use Afsakar\FilamentFormBuilder\EmailBlocks\AbstractEmailBlock;
use Filament\Forms\Components\ColorPicker;
use Filament\Forms\Components\Textarea;

class CustomBlockBlock extends AbstractEmailBlock
{
    public static function getIdentifier(): string
    {
        return 'custom-block';
    }

    public static function getLabel(): string
    {
        return 'Custom Block';
    }

    public static function getIcon(): \BackedEnum|string
    {
        return 'heroicon-o-cube';
    }

    public static function getSchema(): array
    {
        return [
            Textarea::make('content')
                ->label('Content')
                ->required()
                ->rows(3),
            ColorPicker::make('background_color')
                ->label('Background Color')
                ->default('#ffffff'),
        ];
    }

    public static function getDefaultData(): array
    {
        return [
            'content' => 'Custom block content',
            'background_color' => '#ffffff',
        ];
    }

    public static function getView(): string
    {
        return 'email-blocks.custom-block';
    }
}
Customize the view (resources/views/email-blocks/custom-block.blade.php):
<div style="background-color: {{ $background_color ?? '#ffffff' }}; padding: 20px; margin: 10px 0;">
    <div style="font-size: 16px; line-height: 1.5;">
        {!! nl2br(e($content ?? '')) !!}
    </div>
</div>
Register the email block in config/form-builder.php:
'email_blocks' => [
    \App\EmailBlocks\CustomBlockBlock::class,
],
Events
The package fires several events that you can listen to:
FormSubmitted
Fired when a form is submitted:
use Afsakar\FilamentFormBuilder\Events\FormSubmitted;
use Illuminate\Support\Facades\Event;

Event::listen(FormSubmitted::class, function (FormSubmitted $event) {
    $submission = $event->submission;
    // Your custom logic
});
EmailSent
Fired when an email is sent:
use Afsakar\FilamentFormBuilder\Events\EmailSent;
use Illuminate\Support\Facades\Event;

Event::listen(EmailSent::class, function (EmailSent $event) {
    $formSend = $event->formSend;
    // Your custom logic
});
FormSendCreated
Fired when a bulk email send is created:
use Afsakar\FilamentFormBuilder\Events\FormSendCreated;
use Illuminate\Support\Facades\Event;

Event::listen(FormSendCreated::class, function (FormSendCreated $event) {
    $formSend = $event->formSend;
    // Your custom logic
});
Testing
The package includes comprehensive test coverage using Pest PHP.
Running Tests
Run all tests:
composer test
Running Specific Tests
Run only feature tests:
vendor/bin/pest tests/Feature
Run only unit tests:
vendor/bin/pest tests/Unit
Writing Tests
Example test structure:
use Afsakar\FilamentFormBuilder\Models\Form;
use Afsakar\FilamentFormBuilder\Services\FormSubmissionService;

it('can submit a form', function () {
    $form = Form::factory()->create([
        'type' => 'site',
        'is_active' => true,
    ]);

    $service = app(FormSubmissionService::class);

    $submission = $service->submit($form, [
        'name' => 'John Doe',
        'email' => 'john@example.com',
    ]);

    expect($submission)->toBeInstanceOf(\Afsakar\FilamentFormBuilder\Models\FormSubmission::class);
    expect($submission->data['name'])->toBe('John Doe');
});
Code Quality
Run PHPStan analysis:
composer analyse
Run Laravel Pint (code formatting):
composer lint
Database Structure
The package creates the following tables:
- forms: Main form definitions
- form_sections: Form sections for organizing fields
- form_fields: Individual form fields with configuration
- form_submissions: User-submitted form data with template snapshot support
- form_sends: Bulk email sending records with template snapshot support
- email_templates: Reusable email templates
- media: File uploads (via Spatie Media Library)
API Reference
Services
FormSubmissionService
Handles form submission processing:
$service = app(\Afsakar\FilamentFormBuilder\Services\FormSubmissionService::class);

// Submit a form
$submission = $service->submit($form, $data);

// Submit using DTO
$submission = $service->submitFromDto($formSubmissionData);
FormSendService
Handles bulk email sending:
$service = app(\Afsakar\FilamentFormBuilder\Services\FormSendService::class);

// Send to multiple recipients
$service->sendToMultipleRecipients($emailTemplate, $recipients, $subject, $data);
FormRenderService
Renders form components:
$service = app(\Afsakar\FilamentFormBuilder\Services\FormRenderService::class);

// Get form components
$components = $service->getFormComponents($form);
FieldTypeRegistry
Manages field type registration:
$registry = app(\Afsakar\FilamentFormBuilder\Services\FieldTypeRegistry::class);

// Get all field types
$fieldTypes = $registry->all();

// Get specific field type
$fieldType = $registry->get('text');
Advanced Usage
Template Snapshot System
The package automatically preserves email templates at the time of sending or submission. This ensures data integrity and audit compliance.
How It Works
When a form is submitted or an email is sent, the package creates a snapshot of the associated email template, including:
- Template name
- Template subject (for submissions)
- Template content (HTML)
- Template content blocks (block builder configuration)
- Template settings (colors, logo, custom CSS, etc.)
Benefits
- Data Integrity: Emails always display with their original template, even after template modifications
- Audit Trail: Complete historical record of sent communications
- Template Freedom: Update templates without affecting past records
- Legal Compliance: Maintain accurate records of all communications
Automatic Behavior
// When creating a submission - snapshot is automatic
$service = app(\Afsakar\FilamentFormBuilder\Services\FormSubmissionService::class);
$submission = $service->submit($form, $data);
// Template snapshot is automatically saved with the submission

// When sending emails - snapshot is automatic
$service = app(\Afsakar\FilamentFormBuilder\Services\FormSendService::class);
$formSend = $service->sendEmailFromDto($dto);
// Template snapshot is automatically saved with the send record
Rendering with Snapshot
When previewing or sending emails, the system automatically uses the snapshot if available:
// In PreviewFormSubmissionAction
if ($submission->template_content_blocks || $submission->template_content) {
    // Uses snapshot - preserves original template
    $snapshotTemplate = new EmailTemplate([...]);
} else {
    // Falls back to current template for old records
}
Custom Form Processing
Implement the CanProcessSubmission contract to add custom processing logic:
use Afsakar\FilamentFormBuilder\Contracts\CanProcessSubmission;
use Afsakar\FilamentFormBuilder\Models\FormSubmission;

class CustomProcessor implements CanProcessSubmission
{
    public function process(FormSubmission $submission): void
    {
        // Your custom logic
        // e.g., send to external API, trigger workflows, etc.
    }
}
Programmatic Form Creation
Create forms programmatically:
use Afsakar\FilamentFormBuilder\Models\Form;
use Afsakar\FilamentFormBuilder\Models\FormSection;
use Afsakar\FilamentFormBuilder\Models\FormField;

$form = Form::create([
    'title' => 'Contact Form',
    'slug' => 'contact-form',
    'type' => 'site',
    'status' => 'active',
    'is_active' => true,
]);

$section = $form->sections()->create([
    'title' => 'Personal Information',
    'grid_columns' => 2,
    'order' => 1,
]);

$section->fields()->create([
    'type' => 'text',
    'name' => 'name',
    'label' => 'Full Name',
    'is_required' => true,
    'order' => 1,
]);

$section->fields()->create([
    'type' => 'email',
    'name' => 'email',
    'label' => 'Email Address',
    'is_required' => true,
    'order' => 2,
]);
Queue Configuration
For high-volume email sending, configure a dedicated queue:
// config/queue.php
'connections' => [
    'form-emails' => [
        'driver' => 'redis',
        'connection' => 'default',
        'queue' => 'form-emails',
        'retry_after' => 90,
    ],
],
Update your .env:
FORM_BUILDER_EMAIL_QUEUE=form-emails
Run the queue worker:
php artisan queue:work --queue=form-emails
Widgets
The package includes comprehensive analytics widgets for tracking form submissions and sent emails. All widgets are automatically registered and available for use.
Available Widgets
1. FormSubmissionStatsWidget
Displays key statistics about form submissions with interactive charts:
- Total submissions (all time with 7-day trend chart)
- Today's submissions
- Weekly submissions with percentage change
- Unread submissions count
2. FormSendStatsWidget
Displays key statistics about sent forms:
- Total sent forms (all time with 7-day trend chart)
- Today's sent forms
- Monthly sent forms with percentage change
- Total recipients reached
3. FormSubmissionsChartWidget
Interactive line chart showing submission trends with multiple time range filters:
- Last 7 days
- Last 30 days
- Last 3 months (weekly aggregation)
- This year (monthly aggregation)
4. FormSubmissionsByFormWidget
Bar chart displaying submission counts per form (top 10 active forms with color-coded bars).
5. LatestFormSubmissionsWidget
Table widget showing the 5 most recent submissions with quick view actions.
6. LatestFormSendsWidget
Table widget showing the 5 most recent sent forms with quick view actions.
Using Widgets on Resource Pages
Widgets are automatically displayed on their respective resource list pages:
// In ListFormSubmissions.php
protected function getHeaderWidgets(): array
{
    return [
        FormSubmissionStatsWidget::class,
        FormSubmissionsChartWidget::class,
        FormSubmissionsByFormWidget::class,
    ];
}
Using Widgets on Dashboard
To display widgets on your Filament dashboard, add them to your dashboard configuration:
// In your Dashboard page
use Afsakar\FilamentFormBuilder\Filament\Widgets\FormSubmissionStatsWidget;
use Afsakar\FilamentFormBuilder\Filament\Widgets\FormSendStatsWidget;
use Afsakar\FilamentFormBuilder\Filament\Widgets\LatestFormSubmissionsWidget;

protected function getHeaderWidgets(): array
{
    return [
        FormSubmissionStatsWidget::class,
        FormSendStatsWidget::class,
    ];
}

protected function getFooterWidgets(): array
{
    return [
        LatestFormSubmissionsWidget::class,
    ];
}
Customizing Widgets
You can customize widgets by extending them:
use Afsakar\FilamentFormBuilder\Filament\Widgets\FormSubmissionStatsWidget;

class CustomSubmissionStats extends FormSubmissionStatsWidget
{
    protected static ?int $sort = 10;

    protected function getStats(): array
    {
        $stats = parent::getStats();

        // Add your custom stats
        $stats[] = Stat::make('Custom Metric', $value)
            ->description('Custom description')
            ->color('info');

        return $stats;
    }
}
Troubleshooting
Forms Not Appearing
- Verify
is_activeis set totrue
File Uploads Not Working
- Ensure Spatie Media Library is properly configured
- Check storage permissions:
php artisan storage:link - Verify disk configuration in
config/filesystems.php
Emails Not Sending
- Check queue configuration and ensure workers are running
- Verify email credentials in
.env - Check the
failed_jobstable for errors
Performance Issues with Large Recipient Lists
- Reduce
FORM_BUILDER_EMAIL_CHUNK_SIZE - Increase
FORM_BUILDER_EMAIL_CHUNK_DELAY - Use a dedicated queue for form emails
Security
If you discover any security-related issues, please email afsakarr@gmail.com instead of using the issue tracker.
Credits
Support
If you have a question, bug or feature request, please e-mail me at afsakarr@gmail.com Love to hear from you!